My main backpacking shelter is a tarp. I’ve now used tarps for close to 10,000 miles of backpacking and long trails, and haven’t looked back!
I wasn’t always a tarp user. In fact, my first exposure to tarp camping made me regard the whole concept as a foolish endeavor. One where you would likely be wet and miserable much of the time.
Once I made the jump to a tarp myself, I can say that I haven’t ever had an experience where a tarp (rather than a tent) has caused me to be wet. In fact, I’ve had the opposite experience, where a tent’s seam sealing degraded, and I got drenched.
I significantly prefer the versatility of a tarp to a tent. I haven’t found that you sacrifice anything in terms of comfort, or anything else a tent purportedly offers, when backpacking solo.
A tarp setup is going to be lighter than a tent, more versatile than a tent, quicker to setup and tear down, and take up less volume in your pack. For 3-season trips a tent is seldom, if ever, better than a tarp.
This guide is to help make you feel comfortable when it comes to tarp camping and taking the plunge into the tarp world. I’ll detail everything you’ll need to feel confident when out in the wilderness without the comfort of a heavy-ass tent.
What You Need
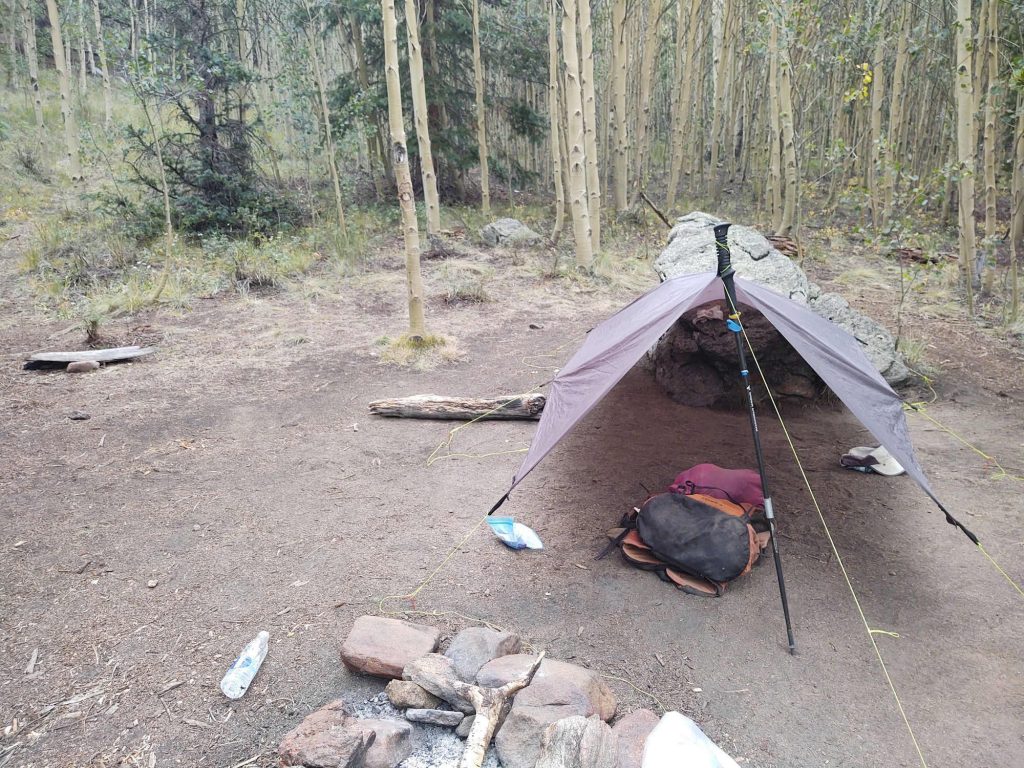
Similar to layering your clothing when backpacking, I recommend a three-piece shelter system consisting of a tarp, a bivy, and a groundsheet. This is exactly what I use.
The total weight is 13.4 oz: tarp (7.75 oz), bivy (4.5 oz), and groundsheet (1.1 oz). The total cost is around $263 for tarp and bivy together. Here’s what you need:
- Guyline cord: Kevlar or spectra cord at under 0.8 grams per meter with a 150 lb break strength (or more). You can also get the ZPacks reflective cord (so you don’t trip over it at night). You’ll need 50 feet in total. The kevlar cord I linked to is a great option because it’s light and doesn’t stretch under load, and has a really great strength to weight ratio!
- Stakes: Titanium shepherd hook stakes at 5 grams each. You need 8 for a full A-frame pitch. The middle guyouts don’t necessarily *need* to be staked (good to know in case you lose one). That’s ~40 grams for your full stake kit.
- Trekking poles: set to 110–120 cm for ridgeline height. I often pitch lower in stormy conditions if there’s a lot of wind.
- Bivy: Borah Cuben Bivy (get the side-zipper version. Trust me.) at 4.5 oz, $192. The bivy slots underneath the tarp when it’s pitched. The bivy is the main sleep system that keeps the bugs away, and adds some additional warmth and minor splash protection (which has almost never been relevant for me). If you don’t mind bugs, you can ditch the bivy and shed a lot of weight easily! Most nights I just throw the bivy down. I only setup the tarp for warmth or because I suspect a storm might be coming through.
- Groundsheet: Frost King 42″ × 62″ window insulation film (0.75 mil polycryo) at 31 grams. No cutting or other modifications are necessary. If you use a bivy, this size polycryo ground sheet is fine. I put my backpack under my feet, outside of the bivy. So my pack makes up the difference between the groundsheet length and my bivy’s dyneema ground layer length. The groundsheet I use mainly to protect the thin dcf bottom of the bivy from extra wear (so yes, it’s a superfluous item, but will significanlty extend the life of your bivy and add some utility for a tiny weight penalty). If you’re cowboy camping without a bivy, go with the 84″ × 110″ version instead, or maybe an over-priced piece of Tyvek.
This post contains affiliate links. If you buy through them, I earn a small commission at no extra cost to you — it helps keep Trail Peaches running. I only recommend gear I’ve personally used on trail.
System cost at a glance: Tarp ($68) + bivy ($192) = $260. Add polycryo groundsheet (~$3) and you’re at $263 for 13.4 oz of shelter. Stakes and cord add about $20 more.
Stakes
Shepherd hook stakes are what I recommend using for a tarp in most conditions. After about 10,000 miles of tarp use, I haven’t found a reason to switch away from the shepherd hooks. I’ve made them work quite well in all situations (including 60-mile-an-hour or more gusts), and prefer them to peg-type stakes.
The shepherd hook is light, fast, easy to pull back out when you leave, and the hook shape locks reliably onto the guyline’s bowline loop. They’re easy to push into the ground (no rocks or hammers to pound them), and easy enough to remove. The red dipped coating let’s you find them on the ground easily if they go flying.
The exception to using the shepherd hook is if you are mainly going to be camping on very sandy beaches. Shepherd hooks pull through loose sand with almost no resistance. If you’re going to be camping on loose sand, switch to deeper stakes like MSR Groundhogs, or you’re going to need to improvise: run or tie the guyline through a piece of driftwood, and bury or weight it with rocks. A pile of 20-plus pounds of rock per corner acts as a deadman anchor. I often use a shepherd hook, and then wedge it between some rocks and pile more on it. That’s typically enough to hold in almost all conditions, including intense gusts of wind. The same logic works on snow.
A stake to skip: I tried Pachalama stakes as a lower-weight option compared to my shepherd hooks, but they really don’t hold very well. The shape also makes rock deadman anchoring harder to rig, and they are much harder to find if they go flying. I wanted to like them, but can’t recommend them.
Choosing a Tarp
You can either choose between DCF (dyneema composite fabric, also called cuben fiber) or silpoly when selecting a tarp (I mean, I guess there’s some other options, but don’t get distracted by those). Stay away from silnylon for tarps because it has too much stretch when it gets wet, so just won’t provide as great an experience.
In general, DCF is lighter and stronger under load per denier than silpoly, but it has some drawbacks. For instance, dyneema is more translucent, so is close to worthless for casting shade (the good kind), more prone to pinholes over time, stiffer, and doesn’t compress as small as silpoly so will take up slightly more pack volume. It’s also not very resistant to abrasion, and is relatively easy to puncture on sticks or sharp rocks. Oh, and it’s WAY more expensive.
Silpoly folds down tighter and handles shade better. If you plan to use the tarp for shade often, then DCF’s translucency is an actual problem. Silpoly also deals better with abrasion, and is less likely to puncture on sticks or rocks.
A few DCF tarp options worth knowing about:
| Tarp | Price | Weight | Size | Notes |
|---|---|---|---|---|
| Etowah Outfitters DCF | $225 | 3.4 oz | 5′ × 8.5′ | Lightest and one of the cheapest DCF options available. A slightly smaller footprint than the SilPoly tarps, or SuperMonk below. |
| ZPacks Flat Tarp 7×9 | $350 | 4.7 oz | 7′ × 9′ | More coverage. At $350 for a flat tarp, you’re paying ~$92/oz to reduce weight vs. a silpoly alternative. More translucent — worse for shade, potentially less hail resistance. |
| ZPacks Hexamid Pocket Tarp | $399 | 5.5 oz | Shaped | Catenary edges and doors. Heaviest and most expensive of the three. Better storm coverage but eliminates the weight advantage. |
| MLD Monk Tarp | $175 | 3.8 to 5 oz | 4.3′ x 9′ | Single piece of DCF with tieouts. Most minimal DCF tarp around. The .8 DCF will be more durable, and comes with a 1.2 oz penalty over the .5 DCF |
| MLD Super Monk Tarp | $235 | 5 oz to 6.5 oz | 5.7′ x 9′ | Bonded piece of DCF with tieouts. The 0.75 DCF will be more durable than the 0.5 DCF but comes with a 1.5 oz penalty |
The Etowah tarp is a pretty interesting option! The 5′×8.5′ footprint is enough to cover you and keep weather off the bivy. Because it’s a single piece of DCF (not bonded), it’s significantly lighter than the MLD Super Monk. The ZPacks 7×9 is pretty similar, although the extra size will give you a bit more space to spread out under, so will make for more comfortable conditions during storms (can sit up better to gather your shit). The Hexamid Pocket Tarp has doors, which I guess could be helpful in a storm, and maybe more comfortable to sit-up in as it’s shaped more like a tent.
Personally, if I was looking at a DCF tarp right now, I’d go for the Etowah or the MLD Super Monk. The 4.3′ width on the [not super] Monk is starting to feel a little too narrow to me, which means you’ll likely have lower pitches in storms, so less room to sit up under the tarp before your head hits the ceiling.
For something like the PCT where you’re not going to have very many days of rain, you can realistically get by with the [not super] Monk. But after a bunch of days of rain, you’d really probably prefer the slightly larger footprint of the Super Monk.
At 5 oz and similar dimensions to a standard Borah Tarp in SilPoly, I think the 0.5 DCF Super Monk Tarp is probably the winner in the DCF Tarp World in terms of price and versatility, although it still won’t be as good as a SilPoly Tarp when it comes to casting shade.
In general, I personally don’t recommend shelling out cash for a DCF tarp unless you get a used one for cheap. I think the cost per oz saved doesn’t make a lot of sense, and there certainly are some major drawbacks. Instead, buy a $70 silpoly tarp! It’s what I use, and I haven’t found a super compelling reason to throw down cash on a DCF tarp (tempting, but unnecessary).
A few SilPoly Tarp Options to Consider
| Tarp | Price | Weight | Size | Notes |
|---|---|---|---|---|
| Borah Gear Flat Tarp | $68 | 7.75 oz | ~6′ × 9′ | Lightest and cheapest SilPoly tarp around. If you’re going solo, you really don’t need a larger size. I’ve never felt the need for a bigger tarp, personally. |
| Yama Mountain Gear Flat Tarp 7×9 | $70 | 7.9 oz | 6′ × 9′ | Basically the same as the Borah Gear tarp, but marginally larger dimensions. |
| MLD Monk Tarp | $110 | 8 oz | 5′ x 9′ | Slightly smaller, heavier, and more expensive than the Borah Tarp. Also comes in DCF with reduced dimensions. |
How to Pitch a Backpacking Tarp
Cut Your Guylines
You’ll cut 8 guylines from the spool of 50 feet that you buy:
- 6 cords at 65 inches — for the corners and side mid-points
- 2 cords at 100 inches — for the center tie-outs on the short sides (ridgeline peaks)
That’s a total of 590 inches, or just under 50 feet. Cut the cord cleanly with scissors or a knife. Kevlar frays at the end, so you’ll need to use a lighter to melt the ends to prevent fraying.
Tying the Bowline Loop
Honestly, I don’t tie bowlines enough that I can just do them on the fly (unlike a Trucker’s Hitch or Figure-8). So, I typically pull up a trusty, offline-usable, knot tying app that I find useful to have on my phone. But the instructions for a bowline loop are below.
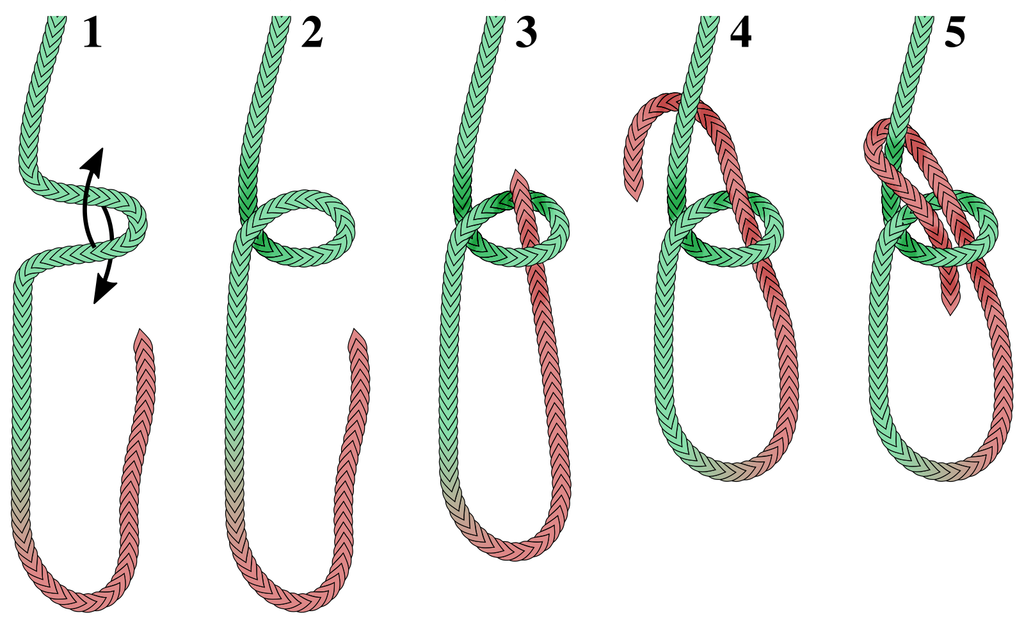
How to tie a bowline:
- Twist a bite of rope so that you can start to form a small loop.
- The small loop in the standing part of the lin should be about 6 inches from the working end.
- The working end should come up through the loop from underneath — this is “the rabbit coming out of the hole.”
- Pass the working end around behind the standing part — “around the tree.”
- Feed the working end back down through the same overhand loop it came out of — “back into the hole.”
- Hold the working end and the part of the loop nearest to it, and pull the standing part to tighten. The knot should form a fixed loop that doesn’t slip.
- Leave a tail of at least 4 inches past the knot. Dress the knot so it’s tidy — a messy bowline can work loose.
Every guyline in this system is going to have two bowlines on it — one at the end that connects to the Tarp, and one in the middle that acts as the default stake-out point. Bowlines form a fixed loop that won’t seize under load, so it will untye easily even after being pulled hard. You can also use an overhand loop (much easier knot to tie), but it’s a jamming knot, so you won’t be able to easily change your loop positions if you want to at some point (with that said, I haven’t changed my loop positions in almost a decade.)
Practice tying a few bowlines before you setup your practice pitch. During your practice pitch, you’ll move your fixed loops if necessary, and leave them there until climate change ruins your backpacking career.
Because you’re effectively tying permanent loops, you’ll only need to know the bowline knot once for the initial setup. Tensioning and adjusting pitch location is going to happen by using a truckers hitch. So you’ll need to learn that knot. The trucker’s hitch is shockingly simple and will take around 10 minutes to learn (some details below).
Attaching Guylines to the Tarp
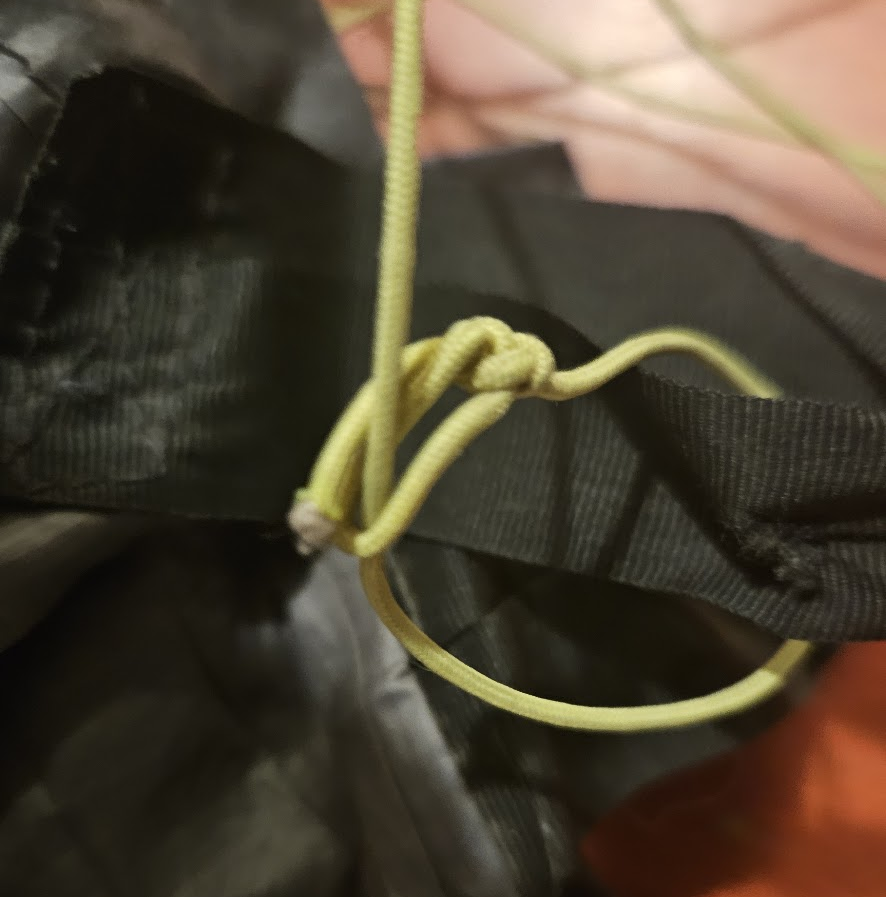
You’re going to create a connection that cinches tight on the tie-out without slipping and without a knot you have to untie later.
- Tie a bowline in one end of the guyline, forming a fixed loop.
- Thread the free end of the cord through the tarp’s tie-out ring or loop.
- Pass the free end back through the bowline loop you tied in step one.
- Pull the free end to snug the bowline loop against the tie-out. The cord cinches on itself and holds without slipping. No additional knot needed at the tarp.
This girth-hitch style connection is secure, doesn’t require you to tie directly to the tarp hardware, and releases cleanly when you want to replace a line.
Setting Your Default Loop
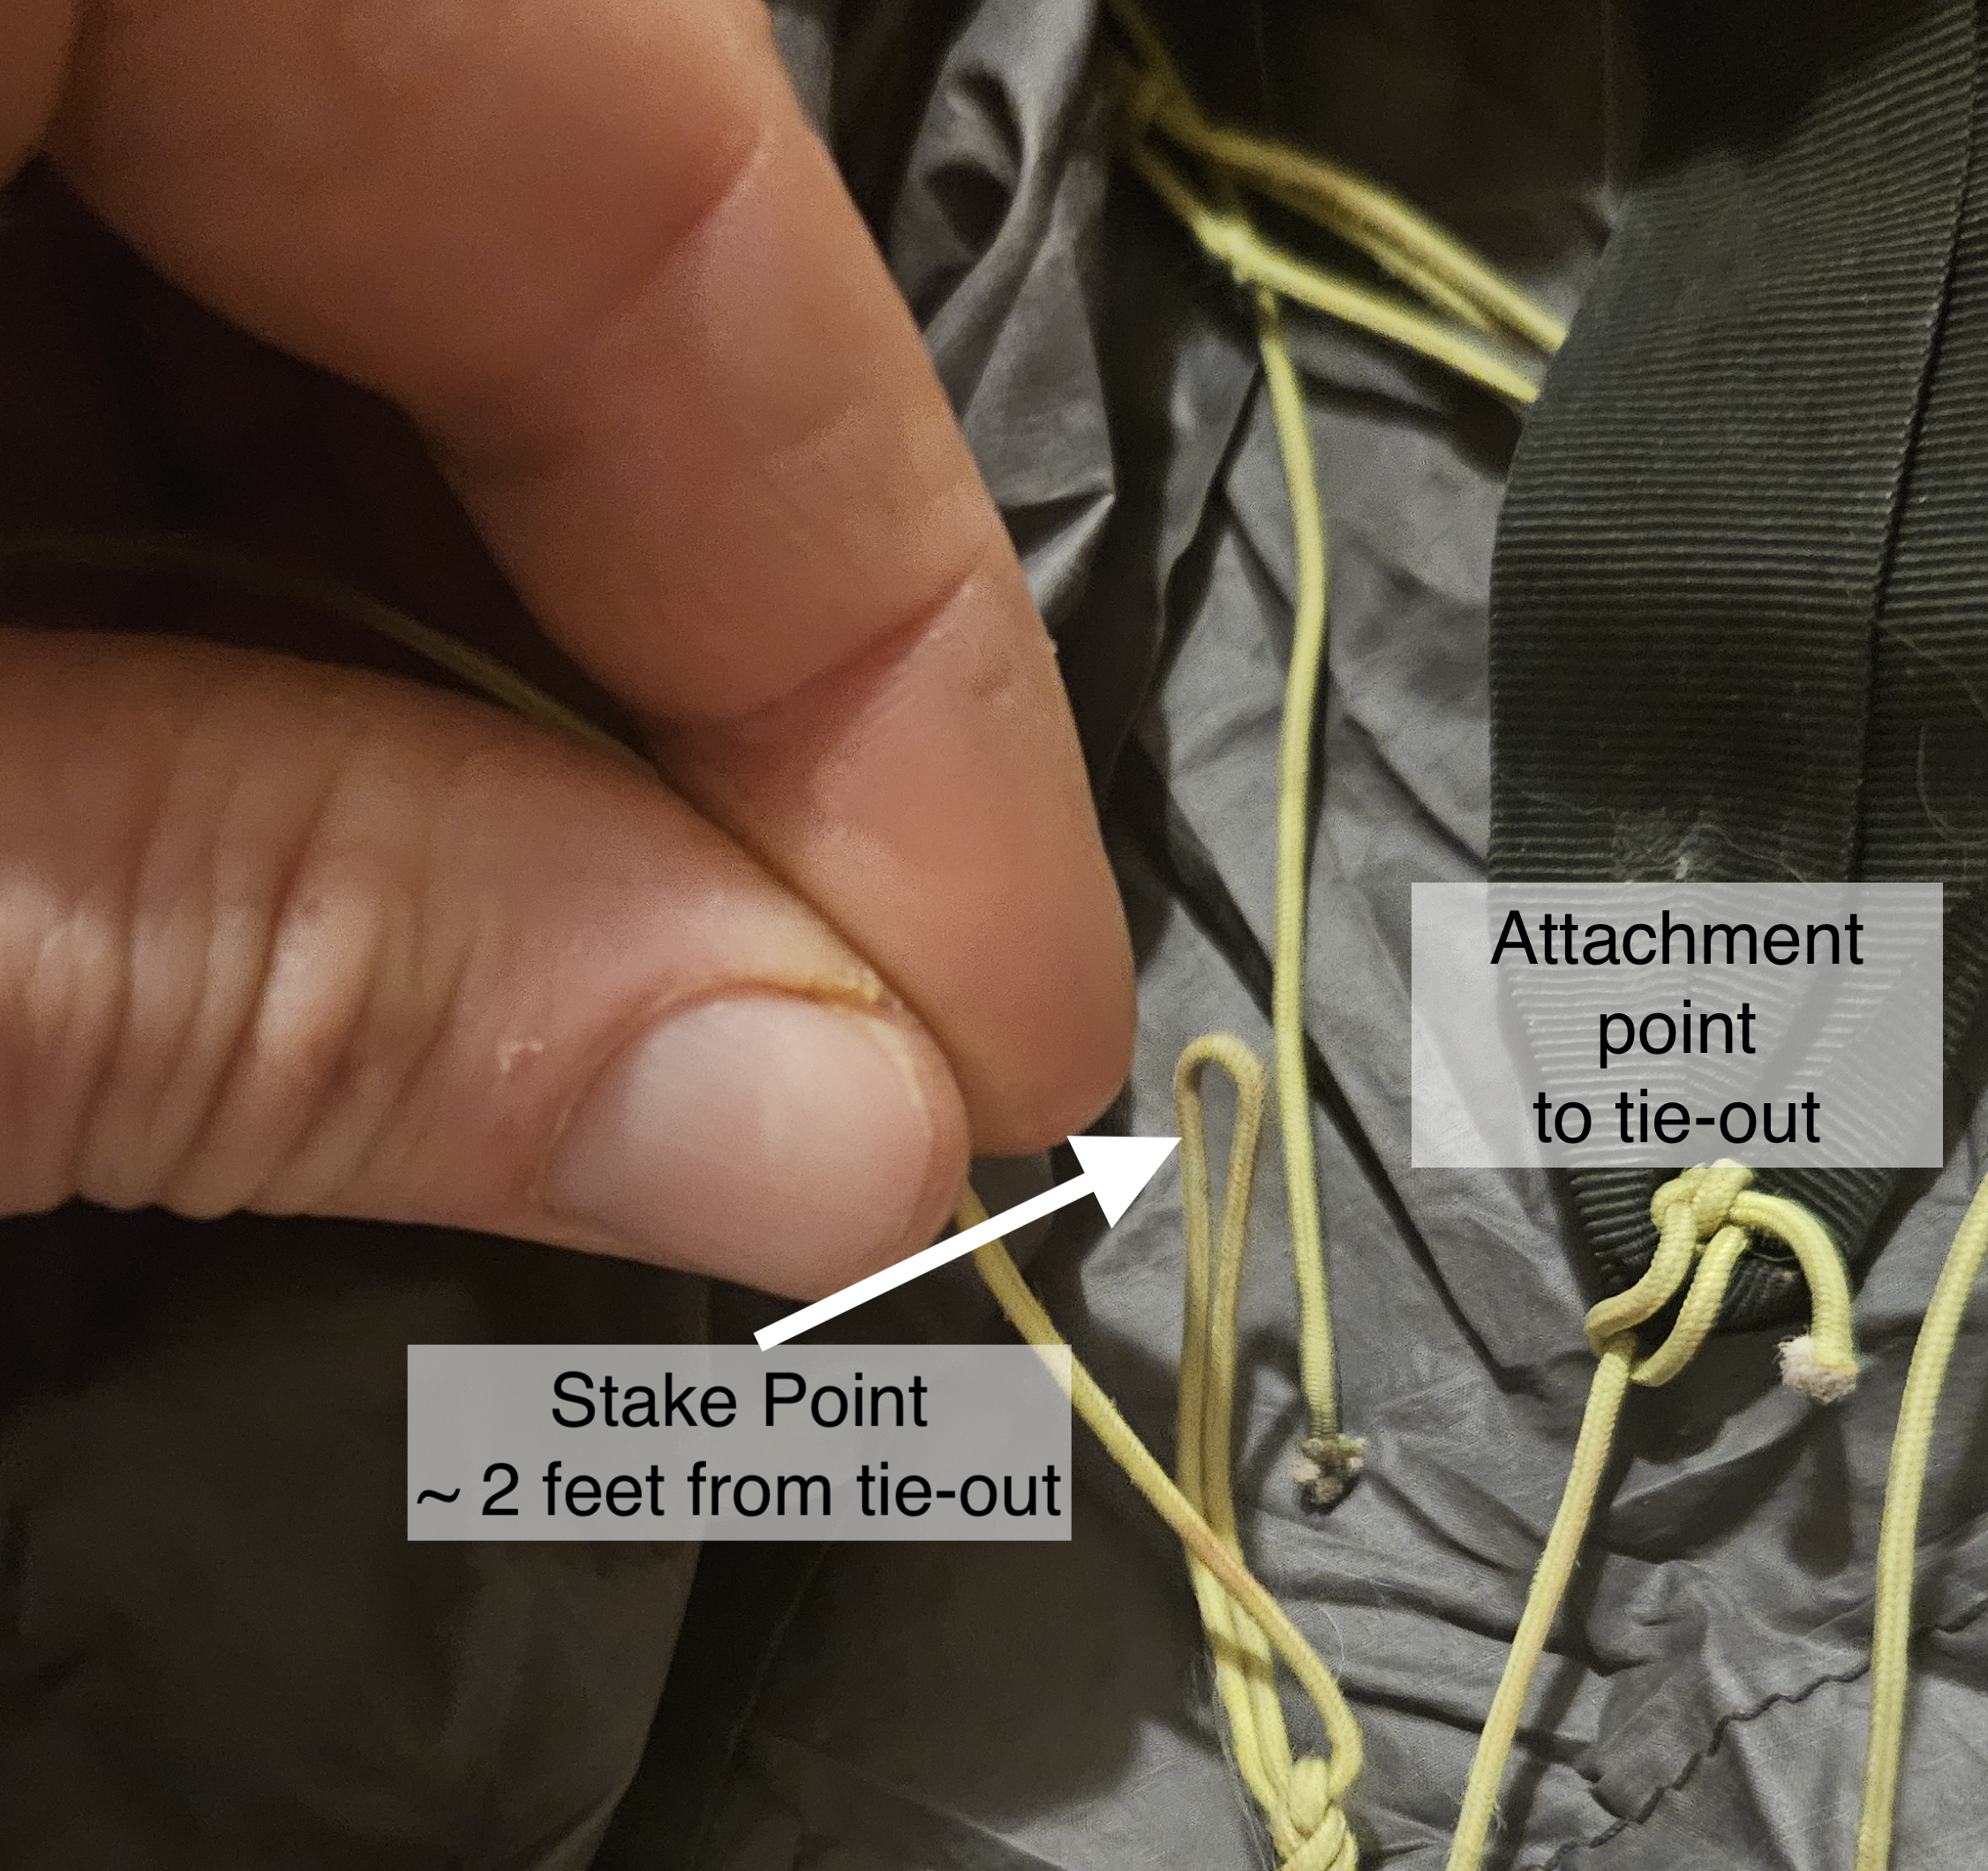
Here’s the part that makes the system fast on trail. Once each guyline is attached to the tarp, tie a second bowline in it at 15 inches from the tie-out for each of the corner guylines, 48 inches for the two ridge guylines, and 10 inches for each of the middle guylines. This becomes your default stake loop, the point where you normally stake the line in standard conditions.
During your practice pitch (see below), you’ll adjust where exactly this loop sits to get a perfectly tensioned A-frame at your trekking pole height. Once it’s set correctly, you rarely touch it again. The extra cord beyond the default loop is your adjustment range for the trucker’s hitch.
Practice Pitch in a Yard or Park
Do this before you go. Set up the full A-frame at home, in a backyard or a park in nice, pleasant weather. This is your chance to get every guyline dialed in. You’re looking for a taut ridgeline with no sag, and symmetric tension across all 8 stake points, all at a trekking pole height between 110 and 120 cm. You can tie two bowlines in all of the guylines before you attach them to the tarp, and then adjust the bowlines to get an even pitch. A full pitching video is embedded below, assuming you setup your tarp as I have, it should only take a couple minutes to fully pitch.
To setup your tarp:
- Find the midpoint on the short side of your tarp. Wrap this around your trekking pole handle. Put the trekking pole in the ground, and stake the bowline loop to the ground.
- Hold the ridge line, and start walking to the other end of the tarp, making sure the trekking pole remains tensioned, as you get to the other guyline on the short side.
- Feed your second trekking pole into the midpoint tie-out, and wrap the guyline a few times around it, and then stake your guyline into the ground. At this point, you should have the ridge of your tent staked out, and both poles should be standing (albeit slanty) on their own.
- Stake out one of the corners. Should be somewhat taught, but shouldn’t pull out the other stakes.
- Go to a corner on the short side of the adjacent trekking pole from what you just staked, and stake out that corner.
- Stake out the remaining two corners. Change the angle and tension as you need to.
- Stake out the middle sections of the tarp.
As you tension each line, slide the default bowline to the right distance from the tie-out if you need to make any changes (you likely shouldn’t need to). When the line is taut and the geometry looks right, you’re good to go! For the most part, you’ll want equal knot distances for all 4 corners. You’ll also want equal knot distances for the 2 ridgeline guyouts. Finally, the midsection guyouts will also want roughly equal knot lengths.
For each of the 4 corners: I use about 15 inches from the tie-out to tie the fixed-distance bowline.
For the ridgeline guyouts: I have them set at about 4 feet (48 inches) from the tarp’s tie-out.
For the 2 middle guyouts: I have them set at about 10 inches from the tarp’s middle tie-out.
The goal: when you stake down the default bowline on trail, you should have a pitch that needs zero adjustment under normal conditions. The only time you deviate is when the terrain or weather forces it.
Fine-Tuning with a Trucker’s Hitch
When conditions aren’t ideal, like hard ground you can’t get a stake into, awkward terrain, or a pitch that just needs more tension, you can use a trucker’s hitch to crank down the line and put the stake wherever makes the most sense.
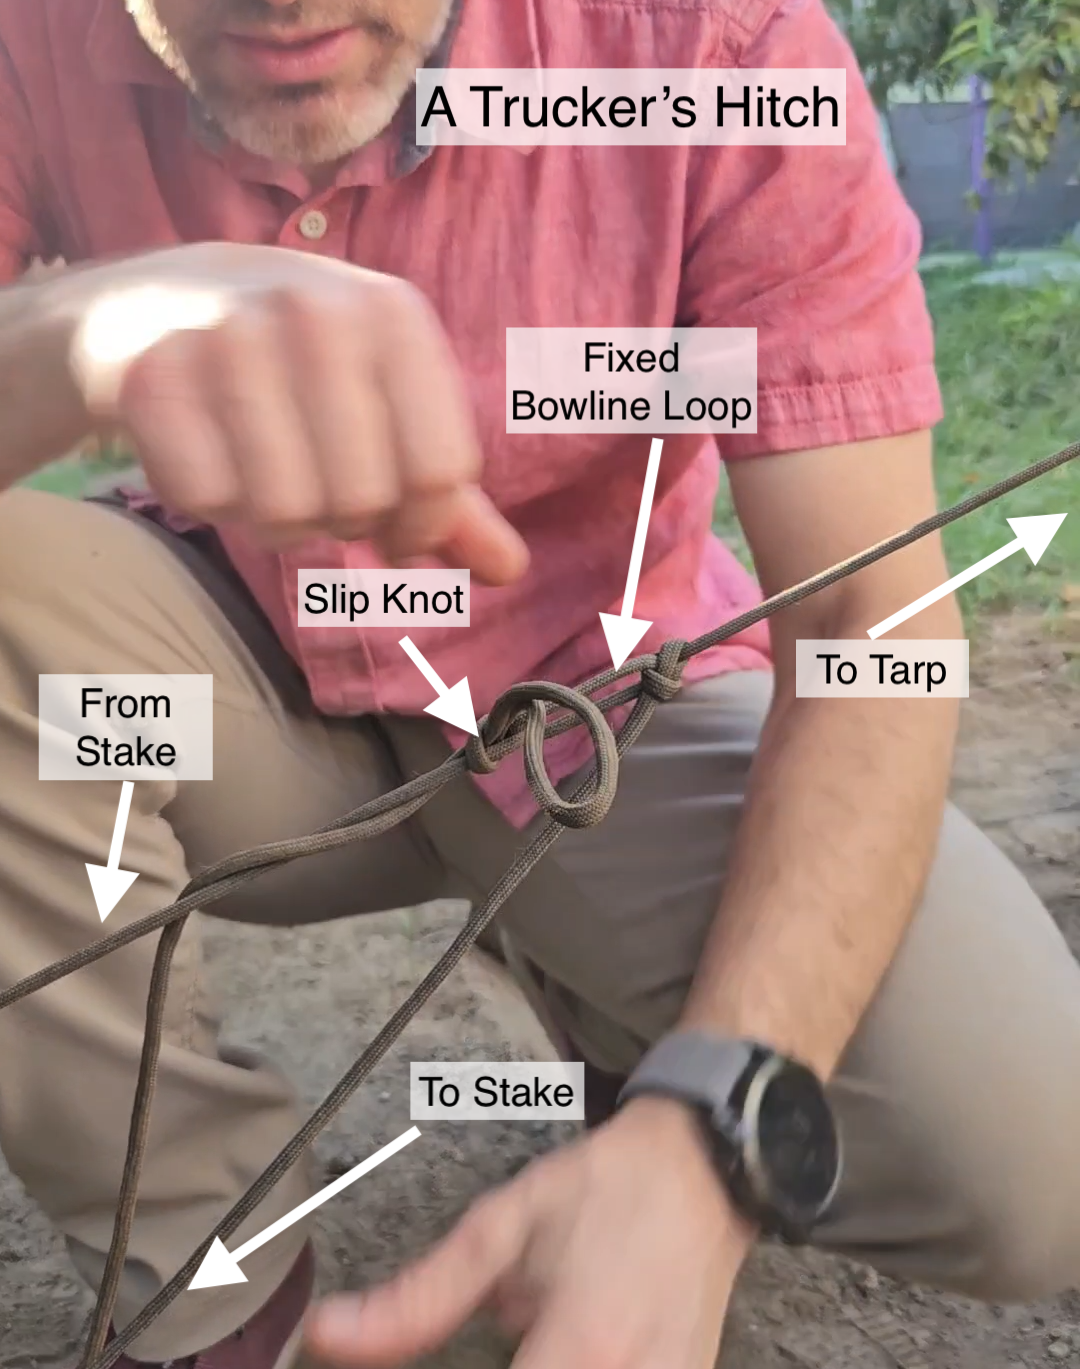
The default bowline is your anchor point, and you’re likely using it as the fixed loop in the trucker’s hitch, although you can tie a new “slip loop” for a different anchor point if needed. Here’s a visual diagram for a trucker’s hitch (although I use a slipknot to finish, not a simple overhand).
- Stake as much of the tarp down through the default bowline loop as normal.
- For any sections you need to adjust with different lengths: Place a stake in the ground where it makes sense.
- Run the end of the guyout through the stake, and back through the fixed bowline loop. The bowline becomes the “pulley” of your trucker’s hitch.
- Pull down on the working end to tension the tarp. The system gives you roughly 3:1 mechanical advantage.
- When tension is right, finish with a slip knot around the standing part of the cord. Hold the rope at the bowline, it won’t move easily, and will stay under tension.
You won’t need this for most pitches. The pre-set bowlines handle most situations. But it’s a fast tool when you do need it.
Tarp Pitch Variations
The A-frame is the default and typically the best and only pitch you really need. Learn that pitch, setup your tent tie-outs FOR that pitch, and don’t worry too much about pitching it in any other way. With that said, there are two other pitches and some A-frame variations I’ve used occasionally for specific situations that added some versatility and pleasentness to my hike.
Half Pyramid
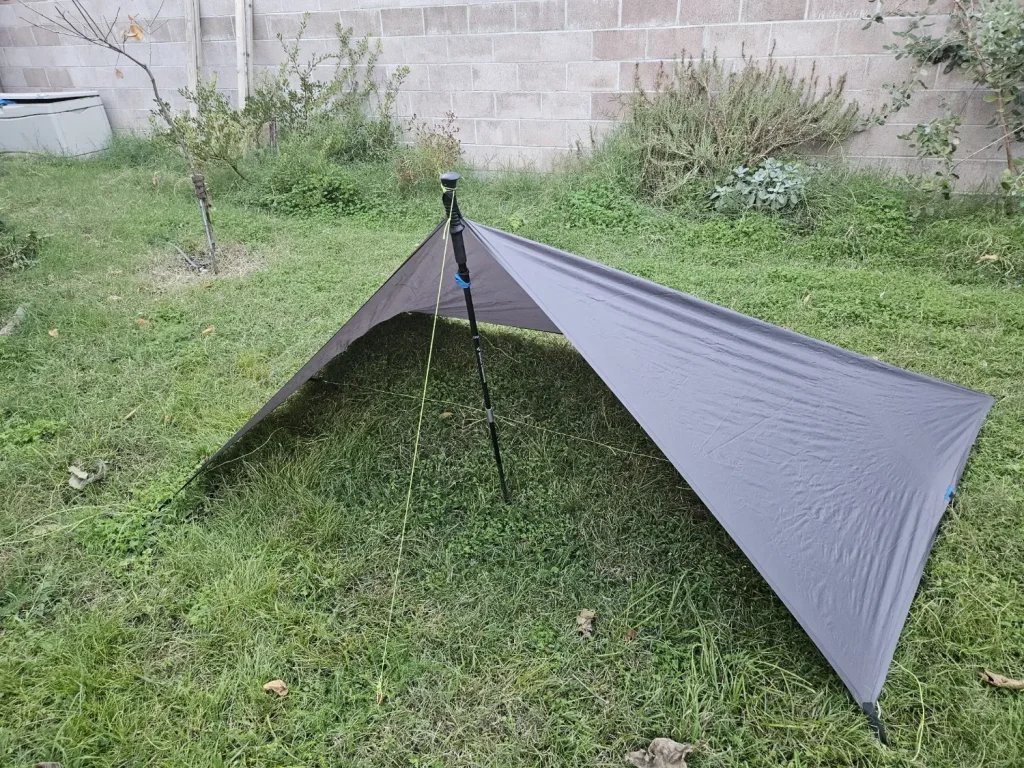
One trekking pole at full height on the windward end, the other end of the tarp staked flat to the ground. The result is a triangular profile with one high wall facing the weather, one low edge shedding rain off the back. It’s not comfortable with small tarp dimensions for sleeping. I use this pitch solely for waiting out storms (typically lightning before heading up to ridges that require me to leave treeline). It’s fast to put up, it sheds water from the right direction.
Slanted Flat Pitch (Shade)
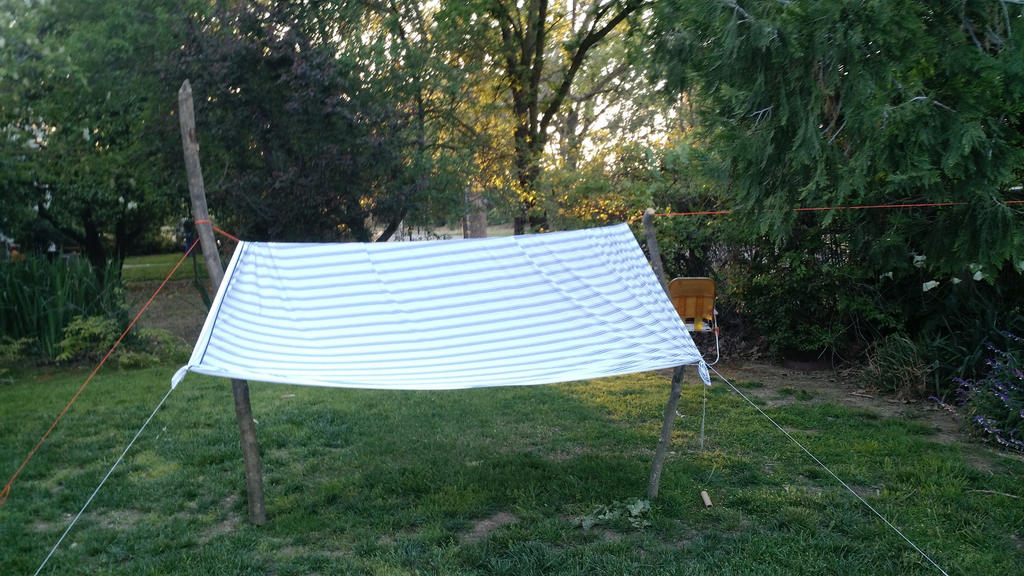
For shade, not for rain or much else, a slanted flat pitch off whatever vegetation is available works well. Pretty quick to setup for a bite of lunch when hanging out in the desert heat. Find a shrub or low branch, attach one edge of the tarp to the shrubbery, stake the opposite edge to the ground at an angle or to your trekking poles. It’s not a weather pitch and it won’t handle wind, but it puts up fast and gets you out of the sun. The tarp becomes a lean-to-style shade structure rather than a shelter.
Low A-Frame (Cold Weather / Wind)
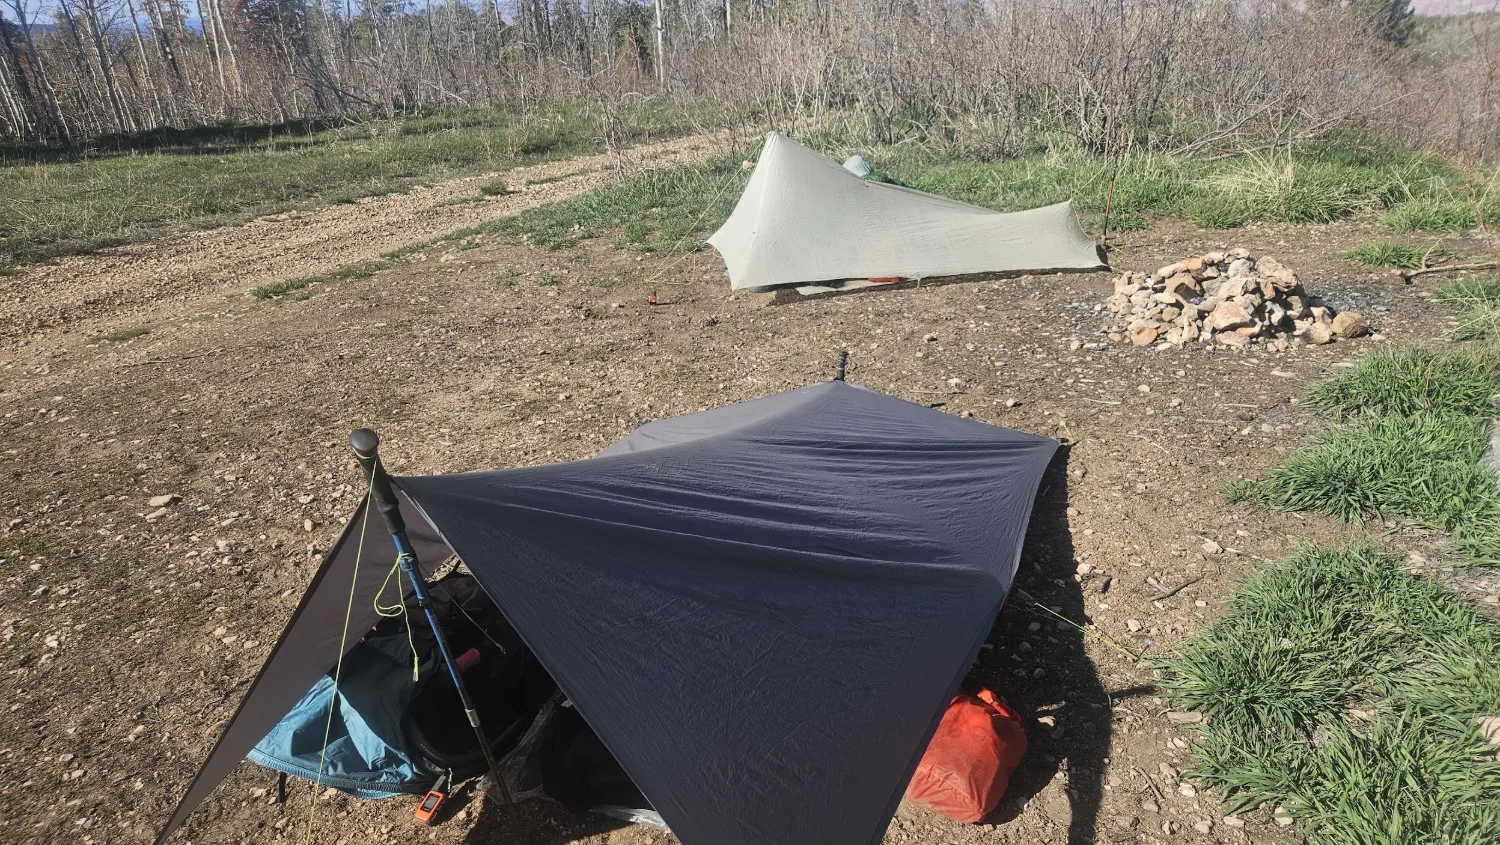
Same A-frame setup, but uses a different far-end height. Instead of staking out the far end at normal tension, bring it close to the ground, almost flat on your footward side. The pole end stays at normal height. The resulting wedge shape traps body heat and cuts wind from the low side, adding several degrees of warmth compared to a standard symmetric A-frame pitch. Use this on cold nights, in exposed sites, or when wind is coming from a predictable direction.
The trade-off is ventilation, as a low far end cuts airflow, which can increase condensation on calm nights. In moving air it’s not an issue. Your pack still goes at the low end, under your feet and bivy.
Tarp vs. Tent: Weight and Cost Comparison
The tarp-and-bivy system beats every DCF tent on durability and packability. Silpoly tarps are better for abrasion and being used for shade. They also compresses tighter than cuben fiber. A tent wins in two specific scenarios: (1) bugs when you’re spending extended time in camp, and (2) basecamping, when you’re leaving your gear and want everything inside a specific contained space that feels slightly more secure. A bivy works fine for bug protection when sleeping, but it’s not where you want to spend several hours just hanging out, awake, in camp.
| Shelter | Material | Weight | Price | Notes |
|---|---|---|---|---|
| Borah Tarp + Cuben Bivy + Polycryo Borah Silpoly Tarp + Borah Cuben Bivy |
SilPoly | 13.4 oz | ~$263 ($68 tarp + $192 bivy) | This guide’s system. More durable, packs smaller than DCF. Bug-proof. |
| Super Monk Tarp + Cuben Bivy + Polycryo Super Monk DCF Tarp + Borah Cuben Bivy |
DCF | ~10.5 oz | ~$450 ($235 tarp + $192 bivy) | Similar to above, but lightest shelter option on this list. |
| ZPacks Hexamid Solo (floorless) | DCF | 9.7 oz + GS (1 – 3 more oz) | $499 + GS | Needs a groundsheet. Bathtub GS: +2.7 oz / +$139. With polycryo: ~10.8 oz. |
| ZPacks Plex Solo | DCF | 12.3 oz | $599 | Fully enclosed. Lightest full-coverage option in the ZPacks lineup. |
| ZPacks Plex Solo Pro | DCF | 13.8 oz | $649 | Storm doors with double-L zippers vs. the Classic. |
| HMG Mid 1 | DCF | 16 oz | $675 | Pyramid mid with integrated DCF bathtub floor — no separate groundsheet needed. |
| Durston X-Mid Pro 1 | DCF | 15.8 oz | $599 | Two doors, two vestibules. More livable interior than most single-wall DCF tents. |
| Tarptent Aeon Li | DCF | 16.85 oz | $549 | Single-wall with vestibule. Currently out of stock. |
DCF shaves weight but at a cost. It also is not as abrasion resistant, and not as packable as SilPoly. The Plex Solo at 12.3 oz is genuinely lighter than the silpoly tarp-and-bivy system, but heavier than a dcf tarp and bivy, and you’re paying $599 for a shelter that packs larger, wears faster, and is poor at blocking sunlight or providing shade.The silpoly tarp and bivy system wins out in versatility and cost. Additionally, a bivy gives you the flexibility of rapidly deploying your sleep system and not needing to pitch anything! In fact, most nights I don’t pitch my tarp and just sleep with my bivy. It’s hard to beat the timing to deploy and packup a bivy (under a minute).
A DCF fully enclosed tent makes the most sense if bugs are likely to be a major problem on your trip and you intend to spend a lot of time hanging around camp.
Bugs Without a Tent
This is mostly what a bivy is for. If you want to hangout around camp and not just go to sleep, a bug headnet plus your rain layers is a solid method for avoiding the blood suckers without the weight penalty of a tent (you’re bringing this gear anyway, right!?). If you’re not rocking a bivy, sleep with the headnet on. When you’re hanging around camp, pull on your rain jacket and pants when mosquitoes are bad.
It’s not going to be the most comfortable for extended time in camp, but for moving through a buggy section of trail, or a couple hours of dinner and hanging out, the bugnet and rain layers work just fine. A full tent only makes sense if you’re spending extended time in one spot with persistent bugs (or if you’re winter camping, of course).
In Closing
It took me quite a few years to actually trust tarps for backpacking. One exceptionally traumatizing story can put you off the whole idea. But 10,000 miles in, I haven’t found a reason to go back. A 13.4-oz shelter system for $263, pitched in under five minutes and works great in an atmospheric river, it’s just hard to argue against!